Select your product to confirm this information applies to you
VXi: Set Up Tool
The Setup Tool is a helpful feature in the TüN™ software that makes configuring the VXi amplifiers fast and efficient. This tool can save users a lot of time and ensures properly configured signal path routing, crossovers and input/output labeling for a majority of system designs. This article explains how to use the Setup Tool.

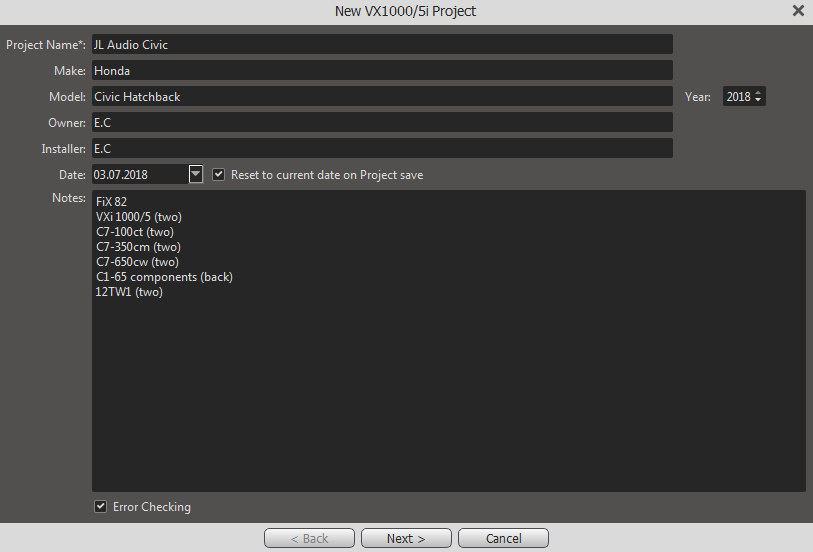
Project Name and Information:
First things, first: every Project will need a Project Name. This name will become the file name for the "VXiproj" file stored in your computer, so it is a good practice to name your Projects consistently and logically.
Once you have selected a Project Name for the Project, you can also enter additional information about the vehicle and system into the following fields:
Vehicle Make
Vehicle Model
Vehicle Owner
Installer Name
Model Year
Notes (Product installed, Preset information, etc.)
Once the Project and vehicle information have been inputted, click the Next button at the bottom of the Setup Tool window. This will open a second page.
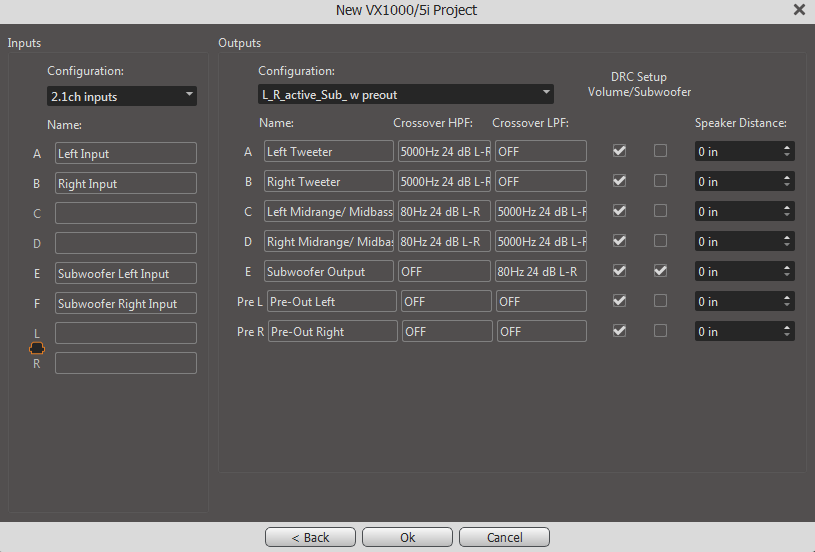
Entering Inputs Configuration:
Use the pull down menu to select the Inputs being used for the VXi.
Optical 2-Channel S/PDIF
2.0 (Analog Left/Right)
2.1 (Analog Left/Right and Subwoofer)
4.0 (Analog Front L/R & Rear L/R)
4.1 (Analog Front L/R, Rear L/R and Subwoofer)
8.0 (Four Left/Right Input Pairs)
Entering Analog Outputs Configuration:
Depending on the Input Configuration selected and the VXi amplifier being used, you will see up to fourteen selectable Output configurations. You can select everything from a simple, traditional "front, rear, plus subwoofer" system, to more advanced systems featuring fully active speaker systems, center channels and subwoofers.
Examples of Analog Outputs Configurations:
3-Way: L/R Tweeter >< Woofer >< Sub — Rear L/R Spkrs (HP)
Everything before the dash (—) describes the configuration of the main front left and right channels, plus the subwoofer. In the example above, we have a 3-way front system, consisting of a left/right tweeter channels, left/right woofer channels, plus the subwoofer channel. The >< symbol denotes an active crossover between the main channels.
Note: The subwoofer channel (where present) is always included in the description of the number of "ways" for the main Left/Right channels.
Everything after the dash (—) describes the configuration of additional channels, like rear channels and/or center channels. The type of active crossover filter for the additional channel is also described, as in "(HP)", which stands for high-pass in the above example.
The configuration described above means that a 3-way main left/right system (front tweeters and woofers, plus a subwoofer) are present, and the Rear Left/Right Speakers, which are high-pass filtered.
Let's look at another example:
2-Way: L/R Speakers >< Sub — Center & Rear L/R Spkrs (HP)
Here we have a 2-way main speaker setup, with front left/right speakers, plus a subwoofer. Additionally, we have a Center Speaker and Rear Left/Right Speakers, both high-pass filtered.
Setting Speaker Distance
The Setup Tool has fields for entering the distance of each speaker from the listening position. The TüN™ software will automatically calculate the delay necessary to offset these different distances. These will be reflected in the Tune tab and can be trimmed with the Delay Trim control later.

One final step:
Once the Input and Outputs Configurations have been made, click "OK" in the bottom right corner of the Setup Tool window and the Setup Tool automatically performs a series of tasks:
Labels all Input Channels and Output Channels
Configures signal path routing, from the Input Mixer, EQ zones and Router, to all the Output Channels
Establishes safe, appropriate High-Pass and Low-Pass filter frequencies and slopes in the Crossovers section
Calculates and enters delay values for Speaker Distance compensation
Assigns an appropriate configuration to the DRC-200 or DRC-205 controller.
Engages the master "MUTE" function so that you can check all your settings before engaging the audio.
The audio system is now ready to be tuned. Any parameters setup by the setup tool in the Setup Tab and the Tune Tab of the main TüN™ interface can now be edited.
Note: Once done with the Setup Tool, mute is engaged. If there is no audio, click the red button to un-mute.